Stamping with Friends Fall Blog Hop - Inspired Thoughts Sympathy


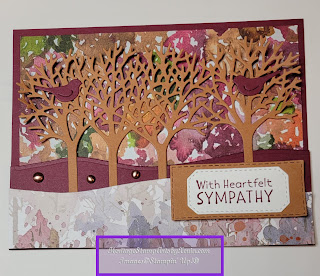
Stamping with Friends Blog Hop for our Fall Theme. I was inspired to make this fancy fold so the designer series paper makes it look like the trees have leaves when closed and bare when open.
Stamp Set(s):
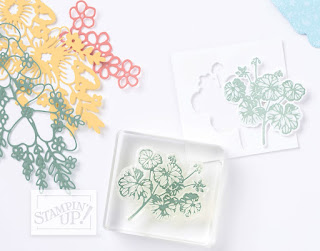
155529 Inspired Thoughts Bundle
Card Stock:
146979 Merry Merlot 8-1/2" X 11" Cardstock
153078 Cinnamon Cider 8-1/2" X 11"
Cardstock
159276 Basic White 8-1/2" X 11" Cardstock
Designer Series Paper:
155841 Beauty of the Earth 12" X 12" (30.5
X 30.5 Cm) Designer Series Paper
Stamp Pad(s) and Ink(s):
147112 Merry Merlot Classic Stampin' Pad
Dies and Embossing Folder(s):
Dies from the Inspired Thoughts Bundle plus
151820 Stitched Rectangle Dies
Embellishments:
156506
Brushed Metallic Adhesive Backed Dots or
155572
2020–2022 In Color Square Gems
Tools:
149653 Stampin’ Cut & Emboss Machine
Miscellaneous:
104430 Stampin’ Dimensionals
Measurements:
Merry Merlot Cardstock: 5.5”x4.25” and 11”x2”
scored at 5.5”
Cinnamon Cider Cardstock: 5.5”x4” and 1.5”x2.5”
Basic White Cardstock: several pieces for
stamping and die cutting for greetings
Beauty of the Earth Designer Series Paper:
5.25”x3” and 5.5”x1.5”
Instructions:
Step 1: Prepare base using the two pieces of Merry Merlot
Cardstock. Use the landscape die to cut the upper edge of the 11”x2” folded so
you have back and front matching.
Step 2: Adhere the larger piece of designer series paper
on the Merry Merlot base piece and then the folded die cut piece so that the
right-hand side is attached to the 5.5”x4.25” back piece and covers the bottom
of the designer series paper.
Step 3: Die cut the line of trees from the Cinnamon Cider
cardstock. Attach to the front of the landscape die cut piece so the trees are at
the front. Die cut the birds from a small piece of Merry Merlot and attach to the trees.
Step 4: Die cut smaller piece of designer series paper using
the landscape die and glue over the bottom of the trees along the front. Add embellishments as you wish to the front.
Step 5: Stamp and die cut greetings from the Basic White
Cardstock as well a blank strip for your message. If this does not give you
enough room, you can add a basic white 5.25”x4” piece at the back of the card.
Step 6: Die cut a back piece from the smaller Cinnamon
Cide cardstock to put behind the greeting at the front. Adhere the greeting at
the front using dimensionals and glue the other greeting and the message die
cuts inside the card as shown on the photo below:

Click on the image below to go to the next Season of Fall Blog Hop entry:

See all the wonderful Season of Fall Blog Hop entries by following these links:
Linda Moore
Donna Schnees
Tricia Butts
Karen Egan
Nancy Reynolds
Caron Bailey
Victoria Littlewood
Xenia Stanford


I love this fancy fold. Sympathy cards can be hard to make, but yours is beautiful and comforting.
ReplyDeleteThank you. I find sympathy cards a challenge to design but my inspiration was the background dsp that made it easy to create with this stamp set and die where I did not have to create individual leaves to cover the tree.
DeleteGorgeous card xx
ReplyDeleteLove it...I will definitely CAS this one...
ReplyDeleteThank you! it is a great one to CASE.
DeleteBeautiful card. Thanks for hopping with us
ReplyDeleteThank you!
DeleteThank you so much!
ReplyDeleteAmazing fancy fold design. Love the Fall scene you have created.
ReplyDelete